Showing posts with label lightroom. Show all posts

2018-08-26

Customizing Tone Curve in Lightroom

Original Histogram
If you use Lightroom and would like to attain the look of presets that you typically have to purchase but would rather make your own then look no further.

Lightroom at the surface is quite simple, but mastering it can take quite a while if you don't have the patience to play with it.

Many options are hidden away or buried in menus so they can be difficult to find. Most can be accessed by use the Shift, Control (Ctrl) or Alt key on a PC or Option on a Mac.
Modified Histogram

Typically your histogram will look like the one on the right (see Original Histogram). To give it that film look you have to adjust the black and white points that are used and shrink the dynamic range of your image (see Modified Histogram).

By shifting your black and white points you will limit the range of tones in your image and give it an interesting look. This may not work for every image and every image will be different, but this is how those filters on your phone or presets you purchase from companies like VSCO work.


Original Tone Curve

While editing your image in Develop mode, simply go to the Tone Curve box and select the small box in the lower right corner (see Original Tone Curve).


Modified Tone Curve
Now select the bottom left point (black) and drag it to a new position. Where is completely up to you, but it should be somewhere along the diagonal dotted line. Now do the same for the point in the upper right (white).

If you want to increase the contrast of your image then you can add a third point in the middle of the two points and drag it upwards away from the dotted line, or to reduce contrast move it below the dotted line.

Your tone curve will now look something like the following (see Modified Tone Curve).


Original
To the right is the original image with no adjustments.


Modified

To the right is the modified image with an adjusted tone curve (see Modified Tone Curve).

You may not see a huge difference in this image, but if you look carefully in the darker areas you will see that the detail in the blacks and background has less detail and is "muddy" looking.

Now that you have the basics you can save this as a preset or make more changes using the options available in develop mode.

Final Image

2013-07-14

Adobe Lightroom and SQL Lite

I've been messing around with Adobe Lightroom 4 and SQL Lite recently trying to find a way to glean some useful information from my library catalog. Why? To learn something about it, to learn some new skills and why not.

So I downloaded SQLLiteSpy and hooked it up to my Lightroom catalog.

WARNING: don't do this while Lightroom is running or you could hose your catalog. It's always best to make a copy of one of your backup catalogs first, then work with that one. Really test the beejezus out of anything that does write operations. 

DISCLAIMER: I will not be held responsible for anything that you do to your catalog, images, computer,  mental health, others, etc. 

OK, if you are still reading and want to play around with your catalog then try hooking up SQLLiteSpy to your Lightroom catalog. You will have to tell it to look for .lrcat file extensions so pick "Any file".

You should see a whole bunch of tables with Adobe or Ag prefixes. This is good.
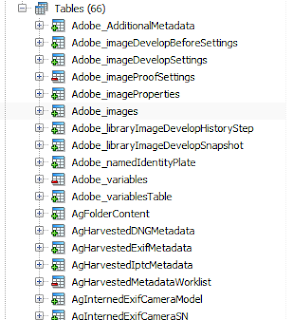
Adobe SQLLite database
There are many interesting tables but you should first look at Adobe_images, AgLibraryFile, AgLibraryFolder and AgLibraryRootFolder. These tables are a great place to start and figure out the relationships of the data.
I was fiddling about with these tables and came up with the following query:
SELECT
root.absolutePath || folder.pathFromRoot || file.baseName || '.' || file.extension AS "FILEPATH"
FROM AgLibraryFile file
JOIN AgLibraryFolder folder ON file.folder = folder.id_local
JOIN AgLibraryRootFolder root ON folder.rootFolder = root.id_local
;
This query will show you the paths for all your images in the catalog.

Date and Time

I found that dates were the trickiest bit to figure out. Lightroom uses the SQL Lite REAL data type but there is absolutely no documentation on how they store it. I searched high and low on the internet and didn't come up with anything useful.

Using SQL Lite to find the current time you can do something like the following.
SELECT datetime('now', 'localtime');
But to figure out how Lightroom actually stores dates and times took some more effort. I read all the documentation on SQL Lite dates and times, searched all over the place for tutorials, etc. and came up with squat. It's like a coveted secret like the holy grail or how they get the caramilk inside the chocolate bar.

Well here it is, here is the secret. They use the year 2001 as their epoch. Weird! Anyway to calculate a date you need to do the following:
SELECT modTime, datetime(modTime,'unixepoch','localtime', '+31 years') FROM AgLibraryFile;
  • localtime adds/subtracts your timezone offset
  • unixepoch uses the unix start date of 1970-JAN-01
  • +31 years adds 31 years to the unixepoch to make it 2001
This will give you a proper date based on your timezone offset. Horray!

Advanced

Now, what I really wanted to attempt isn't available in Lightroom, so I thought I would write a query to do it. I wanted to get a set of records that were exported to my hard drive within the past 90 days. Why? Why not, and I might be able to use some kind of script (Perl, bash, batch, etc.) to work with that data. I wish Lightroom had this functionality. Maybe the Lightroom gods will listen and add this in a future release...
SELECT DISTINCT
  root.absolutePath || folder.pathFromRoot || file.baseName || '.' || file.extension AS "FILEPATH"
FROM AgLibraryFile file
JOIN AgLibraryFolder folder ON file.folder = folder.id_local
JOIN AgLibraryRootFolder root ON folder.rootFolder = root.id_local
JOIN Adobe_images image ON image.rootFile = file.id_local
JOIN Adobe_libraryImageDevelopHistoryStep step ON step.image = image.id_local
WHERE julianday('now', 'localtime') - julianday(step.dateCreated,'unixepoch','localtime', '+31 years') <= 90 
AND step.name LIKE ('Export - H%')
;
Good Luck.

2013-02-18

Geotagging Your Photos with Lightroom

Intro

Geo tagging your photos can be a real pain if you don't have a device that can do it out of the box. Luckily there are other ways to achieve the same result, it just takes a bit more work.

Equipment

You will need:
  1. Smart Phone with GPS or handheld GPS device
  2. Camera (compact, DSLR, mirrorless, etc.)
  3. Lightroom 4
NOTE: some DSLR cameras have the ability to attach a GPS module. If you have the module then all you need to do is attach it and your photos will be tagged auto magically.

Synchronize

To get the best results you must synchronize the time of your GPS device and your camera as closely as possible. This will allow the software to match up the images and locations more accurately.

It is not necessary to have the same time zone set on both devices, but it helps. Lightroom 4 can adjust this during the loading process if they are different.

Photography

When you go out to take some photos whether it be in the wilderness or the city all you need to do is turn on your GPS device and keep it on for the duration of your excursion. When you are done just shut the GPS off. 

Processing

OK, now you are back home. This is where the process gets a little more complicated.

First things first, you need to download your images and import them into Lightroom. I won't cover this part of the process in any detail since many people use different workflows. The basic premise is that you start Lightroom, insert the memory card into your computer and download the images that you want to keep.

The next step involves downloading the data from your GPS device. This is quite easy once you figure it out, unfortunately every device is different. Basically you want to export the data from your trip as a .GPX file. Save this file somewhere on your computer where you can find it easily.

Tagging

Step 1

Click on the ~ icon.
You first need to click on the Map mode which is located at the top right hand side of the Lightroom interface. Click on the ~ icon at the bottom of the screen just above the filmstrip.


Step 2

Select "Load Tracklog" and locate the .GPX file on your computer and click Open.

Click "Load Tracklog"
Select the correct track and time from the list of available tracks.

NOTE: if the timezone offset is different on your camera and GPS device you can adjust that now by clicking on the ~ icon and click "Set Time Zone Offset".


Step 3

Click "Select Photos on Tracklog"
Now click on the ~ icon and click "Select photos on Tracklog". If everything goes well Lightroom should select all the images that you took on that track. If Lightroom selected any photos you should see them selected in the filmstrip (located at the bottom of the screen).


Step 4

Click "Auto-Tag X Selected Photos"
You are almost done, click ~ again and click "Auto tag X Selected Photos" where X is the number of photos located along the track.


Step 5

Make any minor adjustments to the image locations if you think they are incorrect.


Step 6

If you have additional tracks that you want to tag you can select them from the Track listing and repeat steps 3-5.

Conclusion

Once you have done the whole process a couple of times it gets easier. This can save a lot of time if you were tagging your images manually. Combine geo tagging, photography with geo caching and make an adventure of it.

Have fun!