2018-08-26

Customizing Tone Curve in Lightroom

Original Histogram
If you use Lightroom and would like to attain the look of presets that you typically have to purchase but would rather make your own then look no further.

Lightroom at the surface is quite simple, but mastering it can take quite a while if you don't have the patience to play with it.

Many options are hidden away or buried in menus so they can be difficult to find. Most can be accessed by use the Shift, Control (Ctrl) or Alt key on a PC or Option on a Mac.
Modified Histogram

Typically your histogram will look like the one on the right (see Original Histogram). To give it that film look you have to adjust the black and white points that are used and shrink the dynamic range of your image (see Modified Histogram).

By shifting your black and white points you will limit the range of tones in your image and give it an interesting look. This may not work for every image and every image will be different, but this is how those filters on your phone or presets you purchase from companies like VSCO work.


Original Tone Curve

While editing your image in Develop mode, simply go to the Tone Curve box and select the small box in the lower right corner (see Original Tone Curve).


Modified Tone Curve
Now select the bottom left point (black) and drag it to a new position. Where is completely up to you, but it should be somewhere along the diagonal dotted line. Now do the same for the point in the upper right (white).

If you want to increase the contrast of your image then you can add a third point in the middle of the two points and drag it upwards away from the dotted line, or to reduce contrast move it below the dotted line.

Your tone curve will now look something like the following (see Modified Tone Curve).


Original
To the right is the original image with no adjustments.


Modified

To the right is the modified image with an adjusted tone curve (see Modified Tone Curve).

You may not see a huge difference in this image, but if you look carefully in the darker areas you will see that the detail in the blacks and background has less detail and is "muddy" looking.

Now that you have the basics you can save this as a preset or make more changes using the options available in develop mode.

Final Image

2014-08-30

HDR Processing

Normal

Bracketing

Since I have a Nikon camera I bracketed in 1 stop increments using 5 frames. Since I really only want 3 of them, I throw away the +1 and -1 shots.

This leaves me with Normal, -2EV and +2EV (I wish Nikon would fix their software so that you could do this in camera).
-2EV

When shooting HDR, it is important to use a sturdy tripod and to use Aperture Priority (Av or A). This will keep the aperture constant and only change the shutter speed during the various exposures.

The -2EV allows us to capture details in our highlights (bright areas of the image.

The +2EV allows us to capture details in the shadow regions of the image, Which is important since these areas are affected by noise more so than highlights. Digital cameras are also better at capturing highlights than shadows, so getting a correct exposure for the shadow areas is really important.

You should have the best tripod that you can afford and are willing to carry. The camera cannot move during the exposure otherwise aligning the images in software may not align exactly causing weird fringes and ghosting.
+2EV

HDR Processing

Once I downloaded the various images into Lightroom, I will export them to Photomatix Pro or HDR Efex Pro 2. These software packages integrate into Lightroom or Photoshop making use a breeze. Both produce different results, but our main goal is to generate a High Dynamic Range (HDR) image.

Once you have loaded the three images into the HDR tool it will combine the images into one. From there you can play with a number of toggles and sliders to tweak the image. I personally like my HDR images to look somewhat "realistic". Others go for the "half-baked" look, which makes my eyes hurt. Everyone likes their HDR done differently so just play around with it. You can always re-process the image at a later date.

HDR image
Here is the resulting HDR image that I created from the three images above. If you look at it closely you will notice that the sky and trees look horrible. The colours look surreal. The trees look like they were lit by strobes and the sky has funny colours and tones that are unnatural.

Sometimes you can correct the sky by using an adjustment layer with levels, but I am going to show you another way that works great when you are going for that natural HDR look.

Photoshop

Now I load the image into Photoshop by exporting the resulting HDR image in Lightroom. I also export one of the bracketed images (the one with the best exposed sky). Once both of these files are open in Photoshop I shift drag the sky image onto the HDR image. Using the shift key will auto align the layers.

Once that is done I use the Quick Selection Tool and select the sky from the sky image. I then use refine edge option to get a nice selection around the tops of trees. You have to use a brush to paint areas where you want to refine the selection. This takes some practice, so don't get too discouraged. For this image I selected the sky and trees.

HDR + Normal sky
Now you can add a mask to the sky layer. Now the sky will look more natural as you have the sky from the normal image replacing the horrible HDR sky.


HDR + Normal sky with Levels Adjustment Layer
The image looks better but the sky is flat looking. This is easy to fix by adding a levels layer that only affects the sky of the normal image. To do this select the mask from the normal image and add a levels adjustment layer. Now adjust the settings until the sky fits the rest of the image.


Dodge/Burn Layer
The last thing I usually do is fix particular areas of the image using a technique called dodging and burning. This is a carry over from the film days. Basically you add more exposure burn to select areas of the image and less exposure to others dodge. This is a lot easier to do digitally and Photoshop has special tools to do this simply by painting.

First create a new layer and fill it with 50% gray. Now change the layer blending mode to overlay. Now use the dodge/burn tools to paint exposure onto that layer. Make sure to select a really low exposure setting like 5-10%.

If you view just the dodge/burn layer on its own it looks kind of weird. If the effects are too harsh you can adjust the layer opacity/fill to a lower setting.

Finished Image

Final Image
Below are some screen grabs of the Photoshop Layers for each step so you can see how the layers are configured.
Levels adjustment layer set to Lighten
Normal layer with layer mask that only reveals
the sky portion of the image

Dodge/Burn layer set to 70% opacity
I hope this simple tutorial helps you to create more natural looking HDR images.

2014-02-11

Sensor Dust

If you own a digital camera, chances are you have sensor dust. It gets in there somehow, and can make your life a living hell. You can spend a lot of time in Lightroom and/or Photoshop removing dust. but chances are you are missing lots of it.

Unless your aperture was set to f16.0 or higher changes are those dust bunnies are just blurry blobs that are hiding in the corners of your image. You need to use the following trick to find those guys and get them out of there.

The easiest way in Photoshop is to:

  1. Create a Curves adjustment layer
  2. Create a point at about 25% and drag it upwards towards the top.
  3. Create a point at about 75% and drag it downwards towards the bottom
Voila! 

Now look again and be amazed. All those dust bunnies, blemishes, loose hairs, scratches, etc. just pop right out at you.

When you are done editing simply drag that adjustment layer to the trash.

Enjoy.


2013-12-14

Watermarks and Photography

The debate continues. Should you watermark your images? Some people say yes, others say no. Why should you care? It is a complicated issue and one that will probably depend on your personal tastes.

Watermarks come in two main flavors: visible and invisible.

Visible

Visible watermarks are placed onto an image and obscure a part of it with text and/or a graphic. People use visible watermarks for one or more of the following reasons.

Protection

People place a copyright notice somewhere on the image. These go from very simple and discrete to large and annoying. 99% of these are the latter. Photographers who use this kind of watermark are usually doing so to protect their images from theft and use by unscrupulous people.

The thought is that the watermark is hard to remove and thus will deter thieves from using it.

Besides offering protection these types of watermarks allow viewers to identify who took the image and how they can contact them.

Branding

This type of watermark is used to brand the image, so that it is recognizable by people who know the artist. It may be a company logo, graphical signature, typeface or other artistic element.

These types of watermarks are often blended into the image to make them less noticeable.

Artists usually prefer this method as it is less likely to detract from the art.

Invisible

Invisible watermarks are only invisible to the naked eye and rely on a technique called steganography. There are various tools out there, but the best known is Digimarc. It uses special algorithms to hide digital information inside the image without effecting the look of the image. The service costs about $100.00US per year.

The thought is that if someone uses your image illegally you can recover the digital information inside the image to prove that it is yours if legal proceedings occur.

It is almost impossible to tell if one of these invisible watermarks exist, unless you use a tool like Digimarc or have access to the original image. If you have the original you can compare them bit by bit to determine if the data has been altered.

Opinion

My feeling is that if someone wants to steal your image, they will do it. There is no guaranteed way to protect your image on the web, except for not putting it there. Currently there is no technology available that is 100% theft proof.

With the tools that are available today, it will take less than 2 minutes to remove any visible watermark on an image unless it falls into the large and annoying category. If this is the reason why you are placing a watermark on your images then you are wasting your time.

NOTE: if you are putting watermarks on your images, please ensure that they are worth stealing.

I find most watermarks annoying. They ruin my viewing experience. My eye is attracted to the watermark and I cannot enjoy the image.

I prefer to use metadata within the file that I save on the web. This has all my copyright information and contact data. If someone want to reach me they can use that data to find me.

Lately there has been a lot of talk of Orphan Works. Governments across the globe want to pass laws that will protect people from copyright infringement claims if they make an effort to find an artist and can't. If a reasonable effort is made they can claim the image is orphaned and in the public domain. With the use of metadata stored with the file, I don't think they can claim this. Unfortunately some services strip metadata from the images so it is best to check to see if this is happening to your images.

Realistically, I can find the author of an image rather quickly using Google Image Search or other tools like Tineye.

Whether you use watermarks or not is up to you, but in reality they do not offer any more protection from thieves who are intent on stealing your art. Do you really want to track down and sue someone who may not even live in the same country as you? Do you want to spend all day, every day doing this? Is it worth it to you?

I would rather make art and let people see it. The alternative is to keep it in a box in your closet.


2013-10-09

Busy Busy Busy

I recently returned from a trip to Eastern Europe where I spent five weeks travelling. It was a blast!

We visited the following countries in no particular order:

  • Germany
  • Czech Republic
  • Poland
  • Slovakia
  • Austria
  • Hungary
We saw many things, but what shocked us the most was the sheer age of everything. In North America you are lucky to find buildings more than a 120 years old. There we visited churches that were celebrating their 950th birthdays!

We saw numerous castles most in ruins, but a couple which were still in pretty good shape. We also saw many Churches, Cathedrals, Basilicas and Chapels. We even visited a Synagogue and an Ossuary. I am not a religious person, but the sheer beauty of these places was beyond belief.

In Budapest I met up with a colleague from work who was visiting with her daughter. We spent a fantastic evening wandering the city and then having a great dinner at a local restaurant.

We also went to see an exhibit at the National Museum in Budapest celebrating the centennial of the famous photographer Robert Capa. He was an amazing war photographer. He died in 1954 by stepping on a land mine while photographing in Vietnam. I would highly recommend this exhibit if you are in the area.

The biggest hurdle now is that I have to download, process, backup and export all the images I took. With over 5000 images on 8 SD cards it will take quite some time to go through.

Stay tuned for more images and stories.

2013-08-17

What's in My Bag

Well, I haven't posted in a while due to preparations for an upcoming trip. My wife and I are headed to Eastern Europe for five weeks. It's going to be a lot of fun. We have been looking forward to this all year.

I thought I would run down the "What's in my Camera Bag" thing like other people have done, just so you get a sense of all the crap that I carry around with me. While I might not have all this on me for a single outing this is what I am carrying on the plane.


1x Nikon D800 camera
1x Nikon 16-35mm f4.0G lens
1x Nikon 50mm f1.8 lens
1x Nikon spare battery

1x Fuji XE-1 camera
1x Fuji 18-55mm f2.8-4.0 lens
1x Fuji spare battery

1x Samsung Chromebook
1x Western Digital 1TB USB external drive

1x Nexus 4 phone + earbuds
5x 32GB spare memory cards
1x Gorilla pod with ball head
1x Manfrotto 390 tripod
1x cleaning cloth, fluid and tissue

4x chargers (phone, chromebook, nikon, fuji) + wall adapter
1x money belt, passport, papers, etc.
1x combination padlock
1x towel and bathroom essentials
1x misc drugs (painkillers, allergy, etc.)

1x Lonely Planet Eastern Europe book
1x The Name of the Wind book

NOTE: any other clothes and misc. things will be stuffed into the red bag (seen at right). I have a small day bag that will carried on the plane.

2013-07-14

Adobe Lightroom and SQL Lite

I've been messing around with Adobe Lightroom 4 and SQL Lite recently trying to find a way to glean some useful information from my library catalog. Why? To learn something about it, to learn some new skills and why not.

So I downloaded SQLLiteSpy and hooked it up to my Lightroom catalog.

WARNING: don't do this while Lightroom is running or you could hose your catalog. It's always best to make a copy of one of your backup catalogs first, then work with that one. Really test the beejezus out of anything that does write operations. 

DISCLAIMER: I will not be held responsible for anything that you do to your catalog, images, computer,  mental health, others, etc. 

OK, if you are still reading and want to play around with your catalog then try hooking up SQLLiteSpy to your Lightroom catalog. You will have to tell it to look for .lrcat file extensions so pick "Any file".

You should see a whole bunch of tables with Adobe or Ag prefixes. This is good.
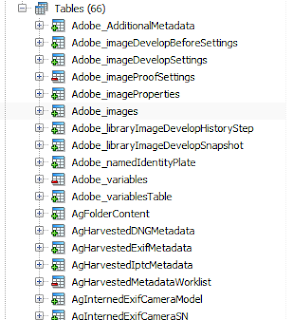
Adobe SQLLite database
There are many interesting tables but you should first look at Adobe_images, AgLibraryFile, AgLibraryFolder and AgLibraryRootFolder. These tables are a great place to start and figure out the relationships of the data.
I was fiddling about with these tables and came up with the following query:
SELECT
root.absolutePath || folder.pathFromRoot || file.baseName || '.' || file.extension AS "FILEPATH"
FROM AgLibraryFile file
JOIN AgLibraryFolder folder ON file.folder = folder.id_local
JOIN AgLibraryRootFolder root ON folder.rootFolder = root.id_local
;
This query will show you the paths for all your images in the catalog.

Date and Time

I found that dates were the trickiest bit to figure out. Lightroom uses the SQL Lite REAL data type but there is absolutely no documentation on how they store it. I searched high and low on the internet and didn't come up with anything useful.

Using SQL Lite to find the current time you can do something like the following.
SELECT datetime('now', 'localtime');
But to figure out how Lightroom actually stores dates and times took some more effort. I read all the documentation on SQL Lite dates and times, searched all over the place for tutorials, etc. and came up with squat. It's like a coveted secret like the holy grail or how they get the caramilk inside the chocolate bar.

Well here it is, here is the secret. They use the year 2001 as their epoch. Weird! Anyway to calculate a date you need to do the following:
SELECT modTime, datetime(modTime,'unixepoch','localtime', '+31 years') FROM AgLibraryFile;
  • localtime adds/subtracts your timezone offset
  • unixepoch uses the unix start date of 1970-JAN-01
  • +31 years adds 31 years to the unixepoch to make it 2001
This will give you a proper date based on your timezone offset. Horray!

Advanced

Now, what I really wanted to attempt isn't available in Lightroom, so I thought I would write a query to do it. I wanted to get a set of records that were exported to my hard drive within the past 90 days. Why? Why not, and I might be able to use some kind of script (Perl, bash, batch, etc.) to work with that data. I wish Lightroom had this functionality. Maybe the Lightroom gods will listen and add this in a future release...
SELECT DISTINCT
  root.absolutePath || folder.pathFromRoot || file.baseName || '.' || file.extension AS "FILEPATH"
FROM AgLibraryFile file
JOIN AgLibraryFolder folder ON file.folder = folder.id_local
JOIN AgLibraryRootFolder root ON folder.rootFolder = root.id_local
JOIN Adobe_images image ON image.rootFile = file.id_local
JOIN Adobe_libraryImageDevelopHistoryStep step ON step.image = image.id_local
WHERE julianday('now', 'localtime') - julianday(step.dateCreated,'unixepoch','localtime', '+31 years') <= 90 
AND step.name LIKE ('Export - H%')
;
Good Luck.